アクションシートの使い方
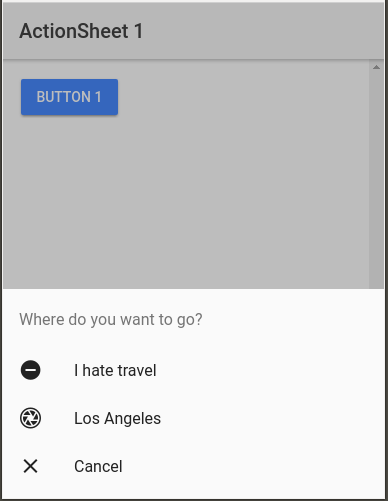
ユーザーに何らかの質問に対する答えを選択してもらうには、ここで紹介するアクションシート (ActionSheet) が有効です。

上記のスクリーンショットになるサンプルコードを書いてみましょう。
まずは Ionic プロジェクトを作成します。
$ ionic start actionsheet1 blank --v2
$ cd actionsheet1
$ ionic serve
作成されたページテンプレート src/pages/home/home.htmlを次のように書き換えます。 ボタンを一つ配置して、ハンドラを設定しただけです。
<ion-header>
  <ion-navbar>
    <ion-title>
      ActionSheet 1
    </ion-title>
  </ion-navbar>
</ion-header>
<ion-content padding>
  <button ion-button (click)="onClick()">Button 1</button>
</ion-content>
TypeScript コードは次のようになります。
import { Component } from '@angular/core';
import { ActionSheetController } from 'ionic-angular';

@Component({
  selector: 'page-home',
  templateUrl: 'home.html'
})
export class HomePage {

  constructor(public actionSheetController: ActionSheetController) {}

  onClick(){
    let actionSheet = this.actionSheetController.create({
        title: "Where do you want to go?",
        buttons: [
          {
            text: "I hate travel",
            icon: "remove-circle",
            role: "destructive",
            handler: ()=>{
              console.log("OK");
            }
          },
          {
            text: "Los Angeles",
            icon: "aperture",
            handler: ()=>{
              console.log("You selected LA!");
            }
          },
          {
            text: "Cancel",
            icon: "close",
            role: "cancel",
            handler: ()=>{
              console.log("Cancel clicked");
            }
          }
        ]
      }
    );
    actionSheet.present();
  }
}
ActionSheetController を取り込み、ディペンデンシ・インジェクション (DI) でオブジェクトを作成します。
ActionSheetController オブジェクトの create メソッドで、アクションシートの内容を定義します。
タイトル (title) やボタンが主な内容になります。
role 設定は任意で設定できます。 destructive または cancel を指定します。cancel と指定されたボタンは一番下に表示されます。
